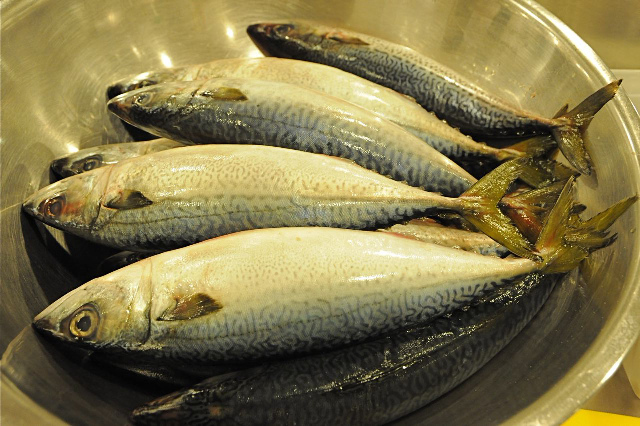
Mackerel’s not the sexiest fish in the sea: We’re not talking about a big (probably endangered) bluefin tuna or a chef’s-darling hamachi yellowtail. And its oily flesh can, admittedly, degrade quickly if it’s not handled properly (read: kept really cold all the time). Degraded oily fish flesh doesn’t sound very good, does it? It doesn’t taste real good either.
BUT! When fresh and handled well, mackerel’s qualities are more than charming. That oiliness gives the meat a smooth richness with a minerally finish, while keeping a sweet flavor, like if tuna and fluke had a secret love child. Its texture is meaty and resilient. Its iridescent skin, a shimmering silver and blue, is gorgeous on the plate, and in a world where it seems that every tasty fish is doomed to feed us until extinction, mackerel stocks are plentiful and sustainable.
Traditionally in Japan, mackerel, called saba, are cured lightly with salt and vinegar when served raw. The original reason for this was to kill any bacteria that may have come from the fish’s particular digestive system, but the salt and vinegar also serve to balance the oiliness and brighten the flavor. Chef Toshio Suzuki of Sushi Zen restaurant also adds a subtle, unusual twist: He lets it sit first in sugar, not enough to make it sweet, but enough to help the flesh retain some moisture and interact with the salt and vinegar to bloom the umami and flavor of the fish. “Japanese cuisine,” he says, “is about bringing out the flavors inherent to the product, not creating flavor through sauces and such.”
If you’re getting your mackerel whole, Chef Suzuki urges you to gut it immediately and scrub the belly cavity under cold running water thoroughly, scale it, filet it, and get curing.
Japanese cured mackerel (saba)
Very fresh mackerel filets (leave belly and pin bones in; they keep the cure from penetrating too much)
Sugar
Kosher or sea salt
Rice vinegar (best if it’s not super harsh; if so, dilute it with a little water)
Sake (the cheap stuff is fine)For serving, sashimi-style:
Good-quality soy sauce
Finely minced fresh ginger
WasabiSpecial-ish equipment:
A very sharp knife
Fish bone tweezers (your eyebrow pluckers might work, but make sure they’re clean)
- First, take off your rings and watches. “Sushi chefs never wear anything on their hands — jewelry, watches, etc.,” Chef Suzuki says. “Treat it as if you are going into surgery.” This man is serious about keeping his fish as bacteria-free as possible.
- Cover a dish or pan with sugar. Dredge the filets in the sugar, making sure to cover both sides, and let them sit for a minute or two. Take them out and set them on a surface where they can drain, like a rack set on a dish. Let cure in the refrigerator for 30 minutes.
- Rinse the filets of the sugar under cold running water. Pat dry with paper towels, and repeat the procedure with salt instead of sugar. Let cure in the refrigerator for 40 minutes.
- While the mackerel is salt-curing, prepare your rinsing vinegar. You want a 9:1 ratio of vinegar to sake, and enough of the mixture to just kind of dunk the filets in and rinse off the salt. Alternatively, you can use cold water.
- Once the filets are rinsed, set them skin-side down in a pan where they can fit in one layer. A little touching is OK, but don’t let them squish one another. Pour in vinegar and sake, again at a 9:1 ratio, until you just cover the filets. (If you intend on doing this again, you can save this vinegar to rinse the mackerel with next time). I found it easiest to set the pan, fish and all, on a scale and pour in pretty much enough vinegar to cover, keeping an eye on how much vinegar I’ve used. Then I added 10 percent of that weight in sake, and swished it around to mix. Let this sit in the fridge for 30 minutes.
- Now take the filets out and dry them thoroughly with paper towels and wrap them tightly with plastic wrap. Wait at least 4 hours to let the cure slowly work its way through the fish, equalizing its effects. Keep the filets in the coldest part of your fridge until ready to serve, up to 2, maybe 3 days later.
- To serve: Lay the filets skin side down. Find the row of long belly bones, behind where the head was, arcing down toward the bottom of the filet. With a very sharp knife (if you don’t have one, consider using a sanitized razor. I’m serious.), find the underside of that row of bones, and in one swoop, cut them and the belly out.
- Once you’ve cut the belly out, look at the skin at the end of the cut: You may find a translucent layer. It’s thin, but tough. Using your fingers, get a good hold on it and peel it off the skin side. It should come off in one piece, revealing the stunningly beautiful metallic skin underneath. Flip the filet back skin-side down. Run your fingers down the centerline of the fish to find the pin bones, and firmly but smoothly pull them out, angling toward the head, with tweezers.
- Now working skin-side up, cut the fish into slices just under a ½-inch wide. Chef Suzuki’s knife was so sharp he literally tapped at the flesh two times in between slices, scoring slits that can absorb soy sauce or be used to set very small pinches of minced ginger.
- Serve with wasabi, minced ginger, and soy sauce to dip. Alternatively, you can paint or drizzle the soy sauce onto the fish, letting it settle in the slits, and splashing its color, beautifully, on the silvery skin.
Recipe by Toshio Suzuki, as presented at Mastering Fish the Japanese Way, by the Gohan Society
